Showing posts with label nerdy. Show all posts

Thursday, February 23, 2017

Stabilizing Satin Stitching

Block of the Month for February consisted of two interlocking circles of fused applique.  I was
determined to finish the edges of said applique with satin stitching.  I think in the past I have used mostly zigzag stitch for this; satin stitch is merely a more closely spaced version of zigzag.

But I had heard that satin stitching requires a stabilizer--you know, a backing to help all those closely placed stitches stay nice and neat.  A perfect opportunity to learn new things play!

What kind of stabilizer works the best?*

*For my machine; using my particular threads; your mileage may vary

The contenders

  • Advertised stabilizers: Pellon E-Z Stitch, Sulky Totally Stable, Therm-o-Web Stitch n Sew
  • Other "frugal" materials: freezer paper, paper towels, backing paper from Wonder Under

A note on threads & needles


I tried my six different stabilizer samples using three different threads.  Each thread was paired with a specific bobbin thread (following advice I read somewhere to use lighter weight thread in the bobbin when satin stitching). 
  • My regular cotton piecing thread: Presencia 50 wt; bobbin: Presencia 60 wt (just slightly thinner).
  • A hefty cotton topstitching thread: Sulky Blendables in 12 wt (this brand also comes in 30 wt); bobbin: Presencia 50 wt cotton
  • Shiny, specialty thread: Sulky Rayon 40 wt; bobbin: Coats & Clark polyester

Needle:  Schmetz Topstitching machine needle, size 90/14 was used throughout.  That thing is a workhorse; color me impressed.

Hints

I read lots of advice on setting up for machine satin stitch before I tried my hand at it.  Recommendations that stood out to me:
  • Use thicker thread; thinner thread as a bobbin
  • Use the correct needle for your thread; a size 90/14 is often recommended even when using your usual piecing/sewing thread
  • Loosen upper thread tension a bit
  • Consider using an embroidery foot for your sewing machine, if one is available
  • Release presser foot tension, if you have that option
  • Go slowly, especially if you have tight curves or corners to navigate
  • Pivot frequently along tight curves (not an issue for my samples)
  • Try not to pull or tug on the fabric; let the feed dogs do the work

Practice, practice practice

For each combination of stabilizer and thread, I stitched a bit on an extra chunk of fabric that used the same fusible applique method as my BOM block.  I did this to check that the tension setting, stitch length and width appeared to still be working.

My machine recommended stitch length of 0.3-0.5 mm; I found that 0.4 mm worked best for all my samples.

Recommended stitch width was 2-5 mm; I used widths of 3.4-3.8.  If I were outlining a complicated design, I might choose narrower width for lesser details or super-curvy edges.

After each test, I checked for puckering, fabric distortion, and ease of removal of the stabilizer product.  When I had a combination I liked, I went ahead and stitched on the actual blocks for my project.  I knew I wanted to use at least two different threads in the finished block.


Results


I have to keep in mind that I was only outlining gentle curves, so I didn't put each product to a rigorous stress test.  Even so, I noticed some differences in how well the feed dogs reacted, how well the fabric remained un-distorted, and how "stabilized" I felt the block to be during the stitching process.

Fewer differences were evident in the ability to cleanly tear away each product.  (Again, not a lot of details, curves and tiny points/valleys to really test this feature.)

And, most surprisingly, not a lot of difference in the appearance of the actual stitching.  Every product gave me a lovely satin stitch.

Pellon E-Z Stitch:  my feed dogs didn't love it, and it was one of the two products that would worry me most for tearing away from intricate designs.  On the positive side, no real distortion of my curve, as it felt like the product "gripped" my fabric the best of those needing to be pinned in place.

Sulky Totally Stable:  my favorite!  Maybe this was an unfair grouping of products--Totally Stable actually adheres to the fabric (via a quick touch of the iron); most of the others rely on pins.  Regardless, this product performed well; thumbs up from my feed dogs, from keeping the block distortion-free, easy release of the fusing from the fabric and easy tear away from the stitching.  It also appears to be re-usable (except where the stitching was), making it somewhat economical.  But I don't consider it to be too expensive of a product anyway.

Therm-o-Web Stitch n Sew:  my second favorite!  Although it has to be pinned into place, Stitch n Sew adheres well to the fabric, flows nicely under the feed dogs, keeps the distortion at bay, and also tears away nicely.

Trying out the "frugal" options
Freezer paper:  although it adheres to fabric, I have always found the stiffness of Freezer Paper to be a problem when I need to maneuver my work.  For use as a stabilizer, I wouldn't choose it.

Paper towels:  this product actually gave me the most problem with distortion.  And I doubt its ability to tear away from the stitching easily--which threatens further distortion.  Thumbs down.

Backing paper from Wonder Under:  why not?  Re-use of a product that would otherwise go straight into the trash?  Not too bad, as long as your pinning is thorough.  Was a tiny bit slippery under my feed dogs, but otherwise acceptable.  And the price was right.


Thanks for playing along!  I have some new knowledge under my belt, and I will feel confident if when I next try some satin stitching.  Really digging this year's Block of the Month at my shop.

Close-up: flashy Sulky Rayon (in turquoise) and modest Presencia cotton

Tuesday, June 24, 2014

Cutest Baby Book *Ever*

I am, of course, biased.  But when I saw this baby book pattern over on Spoonflower, I was just waiting for the proper baby to come along to be the recipient.


No grandchildren (yet).  Where to find the proper baby?  Enter Monkey (her nickname, not her actual name).  The family logo on their minivan features Star Trek characters.  I think the family pet is on there as a Tribble...

http://www.thinkgeek.com/product/f48d/?cpg=cj&ref=&CJURL=&CJID=2296962

Monkey's bedroom is decorated in Star-Wars-and-Winnie-the-Pooh.  (Featuring artwork by James Hance.)

http://www.jameshance.com/

Yay!  Perfect combo of nerdy-geek-baby to bestow this present upon.


Product Review: sew-it-yourself baby book from Spoonflower


What you receive: fat quarter of basic combed cotton (or optional Kona cotton)

Extra items needed to complete the book: basic sewing supplies; optional closure notions (hook-and-loop, button, or snap)

Ease of assembly: all the directions are printed on the fabric, seam allowances are marked, and diagrams are easy enough for someone with basic sewing experience to follow.


Finished product: I was most interested in this book both because of its nerdy theme, but also because of the flaps, as I am a big fan of interactive elements in children's books.  I did not particularly like the way the flaps were meant to attach to the book (but hey, it's a book for a child, not for a perfectionista like me).  I ended up improvising embroidery to attach some of them.  Everyone who has seen it has given the sewn-together book a big thumbs up.


Improvements?  If I were making this again, I would perhaps choose the Kona cotton as the base fabric.  (I have been spoiled by quilt shop fabrics, so the quality of the basic combed cotton was an affront to my sewing machine.)  Also, I would use interfacing, and maybe even some quilt batting.  I might try and make the flaps with topstitched zigzag stitching, so those tiny bits didn't need seam allowances tucked inside.

Mostly, I just wish there were more pages, so the cuteness could go on a little longer...


I think Monkey will like her present.  I think Monkey's parents will love her present more!


Friday, May 23, 2014

Your Daily Rainbow

I pass by another high school on my way to work every day.  Don't know how long ago this was painted, but I finally noticed it last week.


You know how much I like a good rainbow, right?

I understand from the newspaper that the rainbow was the result of a geometry lesson.  (Probably surface area?  That's the chapter my geometry class is just finishing up.)

Perfect: math + rainbows.


Happy day!

Sunday, January 12, 2014

No Longer Anonymous

My sister loves me.  She got me the perfect Xmas gift--without even knowing I was taking the Fabriholics Anonymous pledge plunge for 2014.

Thanks, Sis!
 It did occur to me as I was wearing this around town yesterday that it is kinda hard to remain anonymous about my hoarding struggles when I broadcast this message so boldly.  But isn't one of the first steps to getting over an addiction admitting that we have a problem?

And, knowing that I will attend an annual quilting retreat this month, my crafty sis included another (inspirational) t-shirt:


That girl knows where it's at.

Sunday, December 8, 2013

Snow Lessons

Our snowstorm from Friday has been most unusual for this area--still snow here days later, still blistering cold, and sunny.  Crazy.


Went for a walk in our frozen wonderland, and marveled at the drivers unaccustomed to such conditions.  Here are the lessons I distilled from watching the  pickup trucks:
  • Yes, 4-wheel drive gives you traction and you can drive on packed snow
  • You don't have as much traction as you think (so slow down!)
  • Other drivers (of small cars, for example) don't have the traction you do, and will make you slow down, if only to avoid them.

And, upon thawing out at home, I looked over the Xmas apron bounty and was able to correlate each snow lesson with a corresponding Sewing for Xmas lesson:

  • Yes, starting to sew in September means you have better traction towards finishing gifts before December 24th
  • You don't have as many days left until Xmas as you think (so don't slow down!)
  • Other events will pop up to derail your sewing plans; December is a busy month.

Cute, huh?  My analytic brain never stops working...

Monday, September 17, 2012

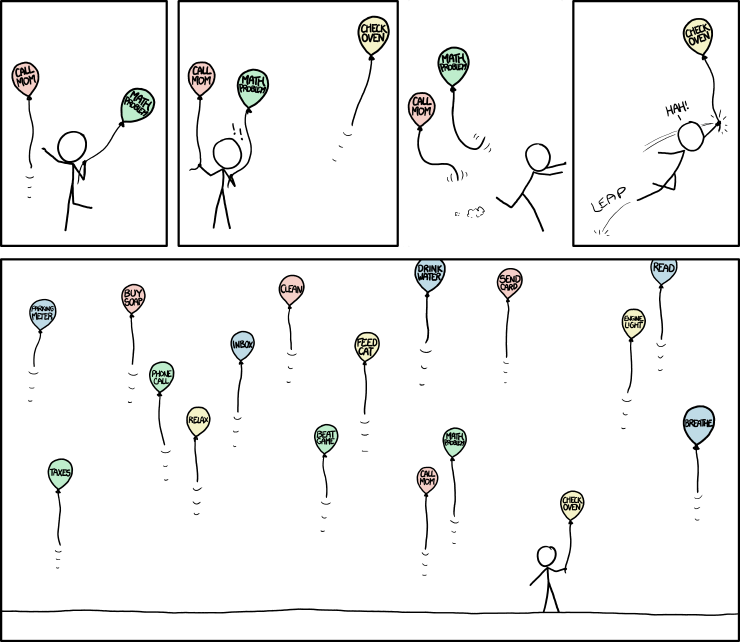
Nerdy comic

Dear Son shared a link with me today, to my favorite online comic, xkcd.  Nerdy, sometimes sweet, intellectual in all the right ways.  *Sigh*

The title to this comic is "ADD", which I read as meaning the mathematical operation.


Silly me, this is my attention-deficit disorder daily routine!  Thank you Child, for understanding your mother. I love you!


Saturday, September 15, 2012

Quilts in geometry class

School has started, and I'm once again a busy bee.  Three different classes to teach--two of them brand new.  I'm scrambling to find my groove, but I know it'll come.

Chapter 2, lesson 6: Geometric Problem Solving.  Hmm, word problems in a geometry setting... What on earth could I use for that lesson?  Oh, that's right: quilting!


Went to stitch-n-bitch this week and got started on the framing for each of the blocks for my black-red-pink baby quilt.  So I made the geometry lesson about the black and white fabrics I'll need for the frames.

 
Made a cute little worksheet illustrating how the finished quilt might look.  Didn't have them consider seam allowances at all, and let them work in pairs to figure out whether I had bought enough fabric or not.  It was surprisingly complicated for them--but I loved the different methods of finding out how much fabric was required.  Most of them worked entirely off area (square inches), with no consideration of if you could cut or sew the fabric using their method of calculating:
  • Take one of the framed blocks (18" x 18"), find its area, then subtract out the area of the shaded block (12" x 12")
  • For each block make 4 strips, each 3" x 15", so each corner overlaps exactly the same way
  • For each block make 4 rectangles, each 3" x 12" and 4 corner squares, each 3" x 3"
  • Take the area of the entire quilt (54" x 54") and subtract out the areas of the shaded blocks (12" x 12" times 9), then divide the result by nine; you will need 4 times this number for the black fabric, and 5 times this number for the white fabric
Inspiration for a lesson

I have the blue blocks hanging up in my classroom for inspiration.  For me as well as the students.

Don't know when I'll get to stitching next.  Heavy sigh.  I always forget what the beginning of the school year feels like...

Sunday, June 10, 2012

Irony in the paperwork jungle

I just love a good ironic moment.  A unique instance of irony is as good as a pun that makes you groan out loud.  (Sample pun from this year's algebra worksheets: Why did the boy sheep fall off the cliff when chasing the girl sheep?  He didn't see the ewe turn.  Awful, right?  Delightful!)  I heard a college professor say that puns are like porn for mathematicians, so I have a justification for my love of them.

So... here I am today, working my 15-minute shift in the miscellaneous papers bin.  This is the pile that went straight to recycle

Much of the bulk there was newspapers.  Of course I had to open each one and page through wondering, "Why did I save this?  Is something valuable in here?"  Nope.  Not a clue.

So this is the way the bin looks now, after many 15-minute sessions.
15-minutes at a time = a cleaner home office!

I slid the pile aside, and discovered this

"Taming the Paper Tiger", an organizational self-help book by Barbara Hemphill.  Ah, glorious irony!  I am pretty confident in saying, without having opened the book recently, that the author certainly doesn't recommend stuffing all your miscellaneous papers into a large bin and moving them about for years.  And definitely, the book on organizing said papers doesn't belong in the mix with the mess.

I see on Amazon that the author has updated this book, breaking it into "home" and "office" versions of taming paper.  Also there is a version for the digital age.  So maybe I can get rid of this book.  After all, my local public library has many of her more recent titles.

When I am ready to tackle the paperwork jungle in other than 15-minute increments.  Maybe set up some sort of system...

Monday, May 7, 2012

Quilter's Choice

Buck-a-block for April was introduced as "quilter's choice".  Sure, there was a pattern, and cutting directions, and an illustration showing what the finished project might look like.  But the component pieces could be put together so many different ways.
This is what the picture on this month's pattern sheet looks like (and you can see which fabric got the nod for the lighter-colored flying geese rectangles).  But I was hoping to see more of a star shape from the placement of the turquoise.
Now that's more like it!  All I did was rotate the four outer corners, and suddenly those turquoise triangles form a star that stands out.  What other combinations might I make?


Still cute (on left).  And not-so-cute.


I kinda like the right hand one of these two better.  Like the square-within-a-square effect in the center.


This is just like the first two arrangements, with the rows of flying geese swapped, turquoise for tan.  I still like the version where the star-effect shows up better.


At some point I stopped to ask myself: how many different combinations would be possible?

The mathematician within me has a solution...  (It's based on combinatorics, but don't let the name scare you.  I had a college professor describe it as "counting without using your fingers and toes", so it can't be too awful.)

Take the number of choices at each location and multiply them.

***Non-quilt example: I have 5 possible shirts [times] 3 possible pants [times] 2 possible shoes (assuming everything goes together) [equals] 30 potential outfits.

***This quilt block: 2 positions for the corner pieces [times] 2 colors for the inner flying geese [times] 2 positions for the inner flying geese [times] 2 colors for the outer flying geese [times] 2 positions for the outer flying geese [equals] 2-to-the-fifth-power, or 32 possible combinations!!!  Glad I didn't stick around to photograph them all. 

But which one will I choose?


Tuesday, February 14, 2012

Tutorial: half-square triangle version

At Quilt Camp, I was shown a new, slick way to make half-square triangles. The gals told me it was not their original idea, so I went onto the internet looking for a source. Found one on YouTube: Missouri Star Quilt Company's version.

I was asked (as the resident math teacher) to figure out how to tell what finished size would result from various original fabric squares.  The ladies had a pair of 5" starting blocks, which cut down to 4 half-sqaure triangle squares that were slightly larger than 3".  Meaning, when adjusted to 3", the resulting finished squares would be 2.5".  I blithely replied that I saw a pattern: would the finished half-square triangle blocks be one-half the size (more or less) of the uncut originals?

I was incorrect, but had to think about the math involved.  I woke up in the middle of the night (bleary-early Sunday morning, to be precise) knowing the process to determine the finished size when using any size squares to start with.  I have heard there are conversion tables available online, but you can do these basic calculations yourself.  Don't fear the math: you have the power!

The Process: what size will I get when I start with a xxx-inch square?
     ** Take the size of your original squares and subtract 1/2" (since you are sewing 1/4" around the outsides)
     ** Take this new number and divide by the square root of 2 (yes, the square root of 2!  see below for the math/nerdy reason for this number)
     ** This is the side length of each of your 4 new half-square triangle squares; subtract 1/2" for seams, and you will have the finished size.  Yay!
     ** EXAMPLE: starting with a 10" square, subtract 1/2" to give 9-1/2"; divide by square root of 2 and get 6.72"; subtract another 1/2" to finish out at 6.22".  (This is just a hair short of a 6-1/4" finished half-square.)

The backwards process: what size should I start with to get a xxx-inch finished block?
     ** Beginning with your desired finished size, add 1/2" for seam allowances
     ** Since we are working backwards, MULTIPLY this number by the square root of 2 (are you curious yet about why you use this number?  see below; I promise it won't hurt you to check out a little remedial geometry)
     ** Finally, ADD another 1/2" for seams.  Round up if you must (those square-root-2 calculations always end up with some wonky decimals), and this is the size of the original squares you should cut.
     ** EXAMPLE: wanting a 4" finished half-square block, add 1/2" to give 4-1/2"; multiply by square root of 2 and get 6.36"; add another 1/2" to yield 6.86".  (This means you should cut 6-7/8", because that is the next closest fractional amount to .86".)

Don't fear the math: a little geometry for you
The calculations for half-square triangles are based on right triangles; specifically, isosceles right triangles (you know--the ones you get when you cut a square on the diagonal: two sides the same length on either side of a right angle, and a longer hypotenuse)


The great thing about right triangles is the whole "a-squared plus b-squared equals c-squared" relationship between the side lengths.  This allows us to calculate any missing side lengths by just knowing the other sides.
 But the relationship between side lengths (the Pythagorean Theorem) is simplified in an isosceles right triangle, since sides a and b are both the same length.

Consider an isosceles right triangle with legs of length 10".  The hypotenuse of such a triangle is approximately 14.1", which is equivalent to 10 times the square root of 2.

Or, how about an isosceles right triangle with hypotenuse of length 4" (this would be the diagonal of my half-square triangle).  The side lengths of this triangle are approximately 2.8" each, which is equivalent to 4 divided by the square root of 2.


And now, the part that makes mathematics more powerful than individual calculations: taking these concrete examples and generalizing them into the side-length relationships in any isosceles right triangle.  Noticing how the square root of 2 played a part in both of the above examples, we go back to side lengths of a and a hypotenuse of length c.

See!  This math stuff isn't quite so hard.  And when you understand a bit of math, you feel powerful.

Tuesday, September 6, 2011

Showing the nerdy side

Went back-to-school shopping recently.  Just had to share my find.  I love being a nerd! 

Yes, even though I didn't need it, I had to buy it.  Maybe it will end up being my "staff meeting" notebook.